Getting Started
Blend2D is a relatively small project that has only one dependency (AsmJit), which is usually built together with Blend2D itself. It's recommended to visit a download page and to read build instructions although the instructions provided here are complete and show how to build a first application with a statically linked Blend2D. The instructions shown here should work for all operating systems and all IDEs and build systems that are supported by CMake.
Tip
All code samples provided by this page are part of Blend2D tests. Tests and sample applications are part of Blend2D and can be built when BLEND2D_TEST=1 CMake variable is set during a configure time.
Preparation Steps
We are going to start from scratch so we will create a new directory and call it a workspace. You can chose any other name, but in this document we will always refer to the workspace:
# Create the workspace and move there.
$ mkdir workspace
$ cd workspace
We need both AsmJit and Blend2D libraries so let's clone them into the workspace we just created:
# Get Blend2D and optional dependencies.
$ git clone https://github.com/blend2d/blend2d
$ git clone https://github.com/asmjit/asmjit blend2d/3rdparty/asmjit
First Application
Our workspace is ready, now we are going to create the first application, let's call it app:
# Create 'app' directory for the application and move there.
$ mkdir app
$ cd app

# Create a CMakeLists.txt project file.
$ touch CMakeLists.txt

# Create the source file of the application.
$ touch app.cpp

# Create a build directory for the application. This highly depends on
# your build system. If you use IDE you would need just one directory,
# if you use other build system like make or ninja your may need more
# directories for debug and release builds. For simplicity we will use
# only one directory called 'build'.
$ mkdir build
You should end up with the following directory structure If everything went right:
workspaceappbuildapp.cppCMakeLists.txt
blend2dblend2d/3rdparty/asmjit
We will start with the following cmake project file CMakeLists.txt:
cmake_minimum_required(VERSION 3.30 FATAL_ERROR)

project(app CXX)

# Some basics, set accordingly to your needs.
set(CMAKE_CXX_STANDARD 17)

# Where the 'app' and 'blend2d' are.
set(APP_DIR "${CMAKE_CURRENT_LIST_DIR}"
    CACHE PATH "Application directory")

set(BLEND2D_DIR "${APP_DIR}/../blend2d"
    CACHE PATH "Location of 'blend2d'")

# Enable Blend2D static build.
set(BLEND2D_STATIC TRUE)
include("${BLEND2D_DIR}/CMakeLists.txt")

# Your application target.
add_executable(app app.cpp)

# Add Blend2D dependency to your application. The dependency
# should provide everything needed - include paths, libraries,
# compiler flags, and compiler definitions.
target_link_libraries(app blend2d::blend2d)
Shared & Static Linking
Blend2D by default builds as a shared library, which was overridden in the cmake script above. When an application links to a dynamically linked Blend2D library the user only needs the library and include paths. However, when linking to Blend2D statically, users must define BL_STATIC macro before including <blend2d.h> header, which is usually done via a -DBL_STATIC compiler flag. When consuming Blend2D library as a blend2d::blend2d cmake target this is done automatically, however, if you are using a different tool to build your application, you must setup it to define BL_STATIC so Blend2D can properly set the visibility of all exported symbols.
More information about build and feature options is provided by Build Instructions page.
And finally put some C++ code to app.cpp:
C++ Source
#include <blend2d/blend2d.h>

int main() {
  // Use constructor or `create()` function to
  // allocate a new image data of the required
  // format.
  BLImage img(480, 480, BL_FORMAT_PRGB32);

  // Attach a rendering context into `img`.
  BLContext ctx(img);

  // Clearing the image would make it transparent.
  ctx.clear_all();

  // Create a path having cubic curves.
  BLPath path;
  path.move_to(26, 31);
  path.cubic_to(642, 132, 587, -136, 25, 464);
  path.cubic_to(882, 404, 144, 267, 27, 31);

  // Fill a path with opaque white - 0xAARRGGBB.
  ctx.fill_path(path, BLRgba32(0xFFFFFFFF));

  // Detach the rendering context from `img`.
  ctx.end();

  // Let's use some built-in codecs provided by Blend2D.
  img.write_to_file("bl_sample_1.png");

  return 0;
}
Output

If you compile and run the application it should create the image shown above.
As can be seen in the example Blend2D C++ API uses a BL prefix and uses RAII for all classes that require memory management. This design simplifies the use of the API and minimizes the possibility of memory leaks. In addition, Blend2D API is exception-safe and would never throw an exception, handling errors will be described later.
Gradients
Blend2D provides a BLGradient class that can be used to describe the following gradients:
- Linear gradient from
[x0, y0]to[x1, y1]. - Radial gradient having the center at
[cx, cy], focal point at[fx, fy], and radiusr. - Conical gradient having the center at
[cx, cy]and anglea.
The next example shows how to use create a linear gradient:
C++ Source
#include <blend2d/blend2d.h>

int main() {
  BLImage img(480, 480, BL_FORMAT_PRGB32);
  BLContext ctx(img);

  ctx.clear_all();

  // Coordinates can be specified now or changed
  // later via BLGradient accessors.
  BLGradient linear(BLLinearGradientValues(0, 0, 0, 480));

  // Color stops can be added in any order.
  linear.add_stop(0.0, BLRgba32(0xFFFFFFFF));
  linear.add_stop(0.5, BLRgba32(0xFF5FAFDF));
  linear.add_stop(1.0, BLRgba32(0xFF2F5FDF));

  // `set_fill_style()` can be used for both colors
  // and styles. Alternatively, a color or style
  // can be passed explicitly to a render function.
  ctx.set_fill_style(linear);

  // Rounded rect will be filled with the linear
  // gradient.
  ctx.fill_round_rect(40.0, 40.0, 400.0, 400.0, 45.5);
  ctx.end();

  img.write_to_file("bl_sample_2.png");
  return 0;
}
Output

To make this document shorter we will not demonstrate radial and conical gradients as they will be used in later examples. In addition, the example above used fractional coordinates when calling fill_round_rect() to show that Blend2D API is not restricted to integers. All function accept double precision floating point coordinates with few exceptions where integral coordinates are allowed like fill_rect().
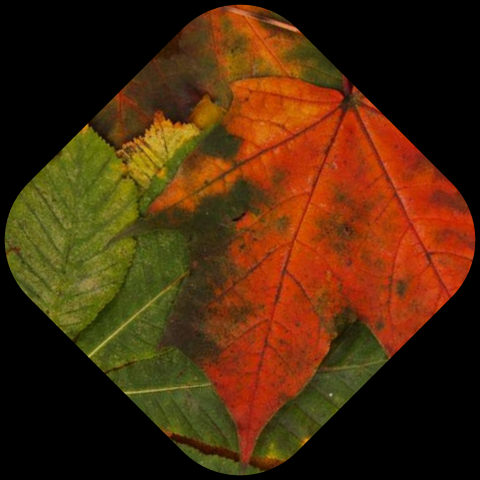
Patterns
Pattern in Blend2D represents an image, transformation matrix, and other properties like extend mode and filter. A single image can be used by multiple patterns and it's also possible to use only a part of an image as a pattern.
C++ Source
#include <blend2d/blend2d.h>
#include <stdio.h>

int main() {
  BLImage img(480, 480, BL_FORMAT_PRGB32);
  BLContext ctx(img);

  ctx.clear_all();

  // Read an image from file.
  BLImage texture;
  BLResult err = texture.read_from_file("Leaves.jpeg");

  // Handle a possible error.
  if (err != BL_SUCCESS) {
    printf("Failed to load a texture (err=%u)\n", err);
    return 1;
  }

  // Create a pattern and use it to fill a rounded-rect.
  // By default a repeat extend mode is used, but it can
  // be configured to use more extend modes
  BLPattern pattern(texture);
  ctx.fill_round_rect(
    BLRoundRect(40.0, 40.0, 400.0, 400.0, 45.5),
    pattern);

  ctx.end();

  img.write_to_file("bl_sample_3.png");
  return 0;
}
Output

Transformations
Transformations can be applied to geometry, images, and styles.
C++ Source
#include <blend2d/blend2d.h>
#include <stdio.h>

int main() {
  BLImage img(480, 480, BL_FORMAT_PRGB32);
  BLContext ctx(img);

  ctx.clear_all();

  // Read an image from file.
  BLImage texture;
  BLResult err = texture.read_from_file("Leaves.jpeg");

  if (err != BL_SUCCESS) {
    printf("Failed to load a texture (err=%u)\n", err);
    return 1;
  }

  // Rotate by 45 degrees about a point at [240, 240].
  ctx.rotate(0.785398, 240.0, 240.0);

  // Create a pattern and use it to fill a round rect.
  BLPattern pattern(texture);
  ctx.fill_round_rect(
    BLRoundRect(50.0, 50.0, 380.0, 380.0, 80.5),
    pattern);

  ctx.end();

  img.write_to_file("bl_sample_4.png");
  return 0;
}
Output
The exactly same transformations that can be applied to BLContext can also be applied to paths and styles. It's also possible to use a BLMatrix2D to build a transformation matrix consisting of several consecutive transformations and apply it at once.
Composition
Blend2D supports all Porter & Duff composition operators and many blending operators that are described in SVG and PDF specifications. These operators can be set via BLContext::set_comp_op() function.
C++ Source
#include <blend2d/blend2d.h>

int main() {
  BLImage img(480, 480, BL_FORMAT_PRGB32);
  BLContext ctx(img);

  ctx.clear_all();

  // First shape filled with a radial gradient.
  // By default, SRC_OVER composition is used.
  BLGradient radial(
    BLRadialGradientValues(180, 180, 180, 180, 180));
  radial.add_stop(0.0, BLRgba32(0xFFFFFFFF));
  radial.add_stop(1.0, BLRgba32(0xFFFF6F3F));
  ctx.fill_circle(180, 180, 160, radial);

  // Second shape filled with a linear gradient.
  BLGradient linear(
    BLLinearGradientValues(195, 195, 470, 470));
  linear.add_stop(0.0, BLRgba32(0xFFFFFFFF));
  linear.add_stop(1.0, BLRgba32(0xFF3F9FFF));

  // Use 'set_comp_op()' to change a composition operator.
  ctx.set_comp_op(BL_COMP_OP_DIFFERENCE);
  ctx.fill_round_rect(
    BLRoundRect(195, 195, 270, 270, 25), linear);

  ctx.end();

  img.write_to_file("bl_sample_5.png");
  return 0;
}
Output

Stroking
Stroking can be specified through BLStrokeOptions class or set directly through BLContext API as demonstrated in the example below.
C++ Source
#include <blend2d/blend2d.h>

int main() {
  BLImage img(480, 480, BL_FORMAT_PRGB32);
  BLContext ctx(img);

  ctx.clear_all();

  BLGradient linear(BLLinearGradientValues(0, 0, 0, 480));
  linear.add_stop(0.0, BLRgba32(0xFFFFFFFF));
  linear.add_stop(0.5, BLRgba32(0xFFFF1F7F));
  linear.add_stop(1.0, BLRgba32(0xFF1F7FFF));

  BLPath path;
  path.move_to(119, 49);
  path.cubic_to(259, 29, 99, 279, 275, 267);
  path.cubic_to(537, 245, 300, -170, 274, 430);

  // Use 'setStrokeXXX' to change stroke options.
  ctx.set_stroke_width(15);
  ctx.set_stroke_start_cap(BL_STROKE_CAP_ROUND);
  ctx.set_stroke_end_cap(BL_STROKE_CAP_BUTT);

  ctx.stroke_path(path, linear);

  ctx.end();

  img.write_to_file("bl_sample_6.png");
  return 0;
}
Output

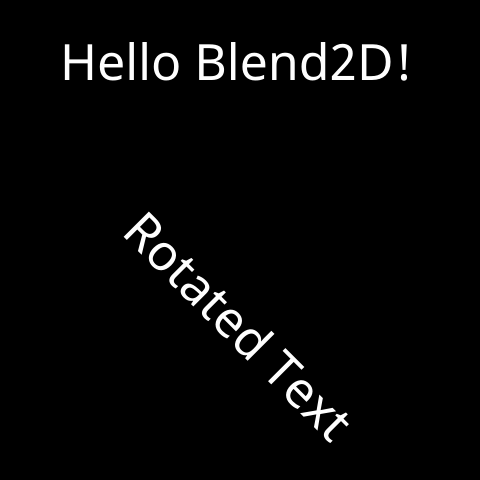
Text Rendering
Text rendering was added recently to Blend2D and it's one of the features that would need further improvements. Blend2D provides both low-level and high-level interfaces to render text and the following example shows how to use the high-level one:
C++ Source
#include <blend2d/blend2d.h>
#include <stdio.h>

int main() {
  BLImage img(480, 480, BL_FORMAT_PRGB32);
  BLContext ctx(img);

  const char font_name[] = "ABeeZee-Regular.ttf";
  const char regular_text[] = "Hello Blend2D!";
  const char rotated_text[] = "Rotated Text";

  ctx.clear_all();

  // Load font-face and handle a possible error.
  BLFontFace face;
  BLResult result = face.create_from_file(font_name);
  if (result != BL_SUCCESS) {
    printf("Failed to load a font (err=%u)\n", result);
    return 1;
  }

  BLFont font;
  font.create_from_face(face, 50.0f);

  ctx.set_fill_style(BLRgba32(0xFFFFFFFF));
  ctx.fill_utf8_text(BLPoint(60, 80), font, regular_text);

  ctx.rotate(0.785398);
  ctx.fill_utf8_text(BLPoint(250, 80), font, rotated_text);

  ctx.end();

  img.write_to_file("bl_sample_7.png");
  return 0;
}
Output
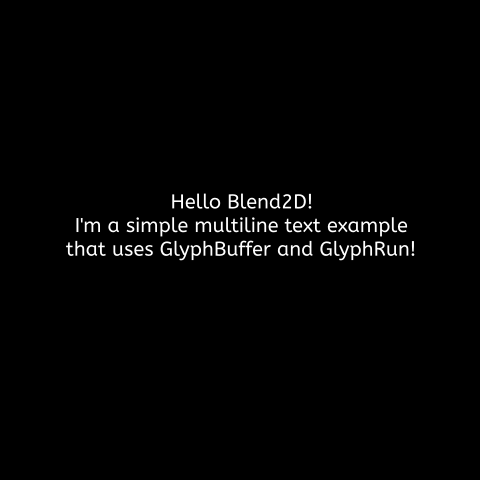
Glyph Buffer
BLGlyphBuffer is a low-level interface that can be used to convert text to glyphs and to retrieve useful information about them. If you need to position text or calculate text metrics then BLGlyphBuffer is the only way of obtaining such information.
C++ Source
#include <blend2d/blend2d.h>
#include <stdio.h>
#include <string.h>

int main() {
  BLImage img(480, 480, BL_FORMAT_PRGB32);
  BLContext ctx(img);

  const char font_name[] = "ABeeZee-Regular.ttf";
  const char* str = "Hello Blend2D!\n"
                    "I'm a simple multiline text example\n"
                    "that uses GlyphBuffer and GlyphRun!";
  BLRgba32 color(0xFFFFFFFFu);

  BLFontFace face;
  BLResult result = face.create_from_file(font_name);
  if (result != BL_SUCCESS) {
    printf("Failed to load a face (err=%u)\n", result);
    return 1;
  }

  BLFont font;
  font.create_from_face(face, 20.0f);

  BLGlyphBuffer gb;
  BLTextMetrics tm;
  BLFontMetrics fm = font.metrics();
  double y = 190.0 + double(fm.ascent);

  ctx.clear_all();
  do {
    const char* nl = strchr(str, '\n');
    gb.set_utf8_text(str, nl ? (size_t)(nl - str) : SIZE_MAX);
    font.shape(gb);
    font.get_text_metrics(gb, tm);

    double x = (tm.bounding_box.x1 - tm.bounding_box.x0);
    ctx.fill_glyph_run(BLPoint((480.0 - x) / 2, y),
                       font, gb.glyph_run(), color);

    y += double(fm.ascent + fm.descent + fm.line_gap);
    str = nl ? nl + 1 : nullptr;
  } while (str);
  ctx.end();

  img.write_to_file("bl_sample_8.png");
  return 0;
}
Output